 |
 |
 |
 |
 |
|---|---|---|---|---|
Targeting low power consumption, this Arduino library for RAKwireless WisBlock Core modules takes care of all the
LoRa P2P, LoRaWAN, BLE, AT command functionality. You can concentrate on your application and leave the rest to the
API. It is made as a companion to the SX126x-Arduino
LoRaWAN library
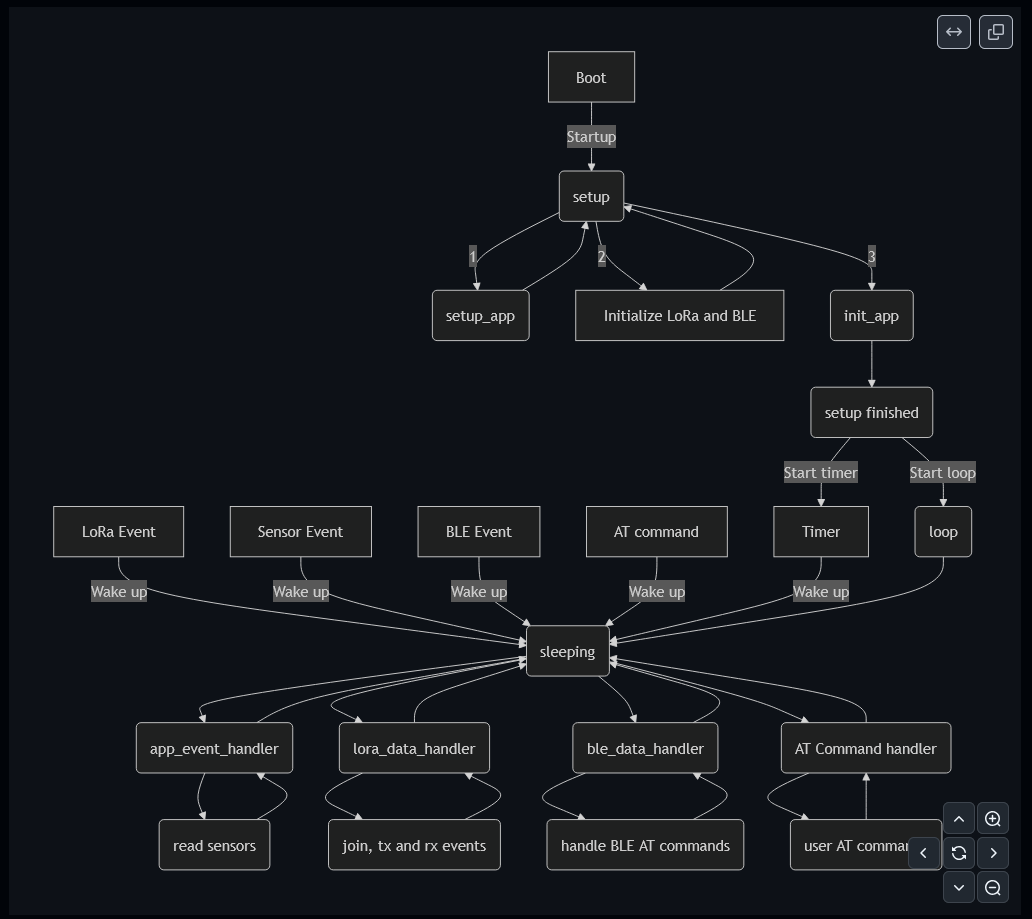
It requires some rethinking about Arduino applications, because you
have no setup() or loop() function. Instead everything is event driven. The MCU is
sleeping until it needs to take actions. This can be a LoRaWAN event, an AT command received over the USB port or an
application event, e.g. an interrupt coming from a sensor.
This approach makes it easy to create applications designed for low power usage. During sleep the WisBlock Base + WisBlock Core RAK4631 consume only 40uA.
In addition the API offers two options to setup LoRa P2P / LoRaWAN settings without the need to hard-code them into the source codes.
V2 of the library changed the AT command format to be compatible with RUI3 AT commands. Please check the AT command manual for RUI3 for differences.
V2 release supports only the RAKwireless WisBlock RAK4631 Core Module
Support for the RAK11310 and RAK1200 might be added in the future
The API is handling everything from setup(), loop(),
LoRaWAN initialization, LoRaWAN events handling, BLE initialization, BLE events handling to the AT command
interface.
REMARK!
The user application MUST NOT have the functions
setup() and loop()!
The user application has two initialization functions, one is called at the beginning of
setup(), the other one at the very end. The other functions are event callbacks that
are called from loop(). It is possible to define custom events (like interrupts from a
sensor) as well.
Sensor reading, actuator control or other application tasks are handled in the
app_event_handler(). app_event_handler() is called
frequently, the time between calls is defined by the application. In addition
app_event_handler() is called on custom events.
ble_data_handler() is called on BLE events (BLE UART RX events for now) from
loop(). It can be used to implement custom communication over BLE UART.
REMARK!
This function is not required on the RAK11310!
lora_data_handler() is called on different LoRaWAN events

All AT commands can be found in the AT-Command Manual Not all RUI3 AT commands are supported. A list of available AT commands can be retrieved with AT? from the device
Two custom AT commands have been added to the default RUI3 AT command set:
Description: Set the automatic transmission interval
This command allows to set the interval in seconds between automatic packet transmissions. If set to 0, automatic packet transmission is disabled.
| Command | Input Parameter | Return Value | Return Code |
| ATC+SENDINT? | - | ATC+SENDINT: "Get or Set the automatic send interval |
OK |
| ATC+SENDINT=? | - | <interval in seconds> |
OK |
ATC+SENDINT=<Input Parameter> |
<interval in seconds> |
- | OK or AT_PARAM_ERROR |
Examples:
ATC+SENDINT?

ATC+SENDINT: Get or Set the automatic send interval
OK

ATC+SENDINT=?

ATC+SENDINT:60
OK

ATC+SENDINT=60

OK
Description: Show device status
This command allows the user to get the current device status.
| Command | Input Parameter | Return Value | Return Code |
| ATC+STATUS? | - | ATC+STATUS: Show LoRaWAN status |
OK |
| ATC+STATUS=? | - | < status > | OK |
Examples:
ATC+STATUS?

ATC+STATUS: Show LoRaWAN status
OK

// When in LoRaWAN mode:

ATC+STATUS=?
Device status:
   RAK4631
   Mode LPWAN
   Auto join enabled
   Network joined
LPWAN status:
   Dev EUI AC1F09FFFE09016C
   App EUI 70B3D57ED00201E1
   App Key 2B84E0B09B68E5CB42176FE753DCEE79
   Dev Addr 26021FB4
   NWS Key 323D155A000DF335307A16DA0C9DF53F
   Apps Key 3F6A66459D5EDCA63CBC4619CD61A11E
   OTAA enabled
   ADR disabled
   Public Network
   Dutycycle disabled
   Join trials 5
   TX Power 0
   DR 3
   Class 0
   Subband 1
   Fport 2
   Unconfirmed Message
   Region AS923-3
   Send Frequency 300

// When in LoRa P2P mode:

ATC+STATUS=?
Device status:
   RAK4631
   Mode P2P
   P2P frequency 916000000
   P2P TX Power 22
   P2P BW 125
   P2P SF 7
   P2P CR 0
   P2P Preamble length 8
   P2P Symbol Timeout 0
   Send Frequency 300
Description: Port settings
This command allows the user to access and configure port settings.
| Command | Input Parameter | Return Value | Return Code |
| ATC+PORT? | - | AT+PORT=<Port><CR>. Get or Set the Port |
OK |
| ATC+PORT=? | - | 1-223 | OK |
ATC+PORT=<Input Parameter> |
1-223 | - | OK or AT_PARAM_ERROR |
Examples:
ATC+PORT?

ATC+PORT: Get or Set the Port=[1..223]
OK

ATC+PORT=?

ATC+PORT:2
OK

ATC+PORT=2

OK
Starting with WisBlock API V1.1.2 the AT Commands can be extended by user defined AT Commands. This new
implementation uses the parser function of the WisBlock API AT command function. In addition, custom AT commands
will be listed if the AT? is used.
REMARK! In RUI3 custom AT commands are called with ATC instead of AT!
To extend the AT commands, three steps are required:
The custom AT commands are listed in an array with the struct atcmd_t format. Each entry consist of the AT command, the explanation text that is shown when the command is called with a ? and pointers to the functions for query, execute with parameters and execute without parameters. Here is an example for two custom AT commands:
atcmd_t g_user_at_cmd_list_example[] = {
    /*|    CMD    |     AT+CMD?      |    AT+CMD=?    |  AT+CMD=value |  AT+CMD  |  Permissions  |*/
    // GNSS commands
    {"+SETVAL", "Get/Set custom variable", at_query_value, at_exec_value, NULL, "RW"},
    {"+LIST", "Show last packet content", at_query_packet, NULL, NULL, "R"},
};

atcmd_t *g_user_at_cmd_list = g_user_at_cmd_list_example;
REMARK 1
The structure for custom AT commands is extended for RUI3 compatibility. Older code
written for WisBlock-API V1.x needs to be adjusted to this new structure.
REMARK 2
For
functions that are not supported by the AT command a NULL must be put into the
array.
REMARK 3
The name g_user_at_cmd_list is fixed and
cannot be changed or the custom commands are not detected.
REMARK 4
The permissions are
given as a string. Valid entries are "R" (read only), "W" (write only), "RW" (read and
write)
A variable with the number of custom AT commands must be provided:
/** Number of user defined AT commands */
uint8_t g_user_at_cmd_num = sizeof(g_user_at_cmd_list_example) / sizeof(atcmd_t);
REMARK
The name g_user_at_cmd_num is fixed and cannot be changed
or the custom commands are not detected.
For each custom command the query and execute commands must be written. The names of these functions must match
the function names used in the array of custom AT commands. The execute command receives as a parameter the value of
the AT command after the = of the value.
Query functions (=?) do not receive and parameters and must always return with 0. Query
functions save the result of the query in the global char array g_at_query_buffer, the
array has a max size of ATQUERY_SIZE which is 128 characters.
Execute functions with parameters (=<value>) receive values or settings as a
pointer to an char array. This array includes only the value or parameter without the AT command itself. For example
the execute function handling ATC+SETDEV=12000 would receive only the
120000. The received value or parameter must be checked for validity and if the value
of format is not matching, an AT_ERRNO_PARA_VAL must be returned. If the value or
parameter is correct, the function should return 0.
Execute functions without parameters are used to perform an action and return the success of the action as either
0 if successfull or AT_ERRNO_EXEC_FAIL if the execution
failed.
This examples is used to set a variable in the application.
/*********************************************************************/
// Example AT command to change the value of the variable new_val:
// Query the value AT+SETVAL=?
// Set the value AT+SETVAL=120000
// Second AT command to show last packet content
// Query with AT+LIST=?
/*********************************************************************/
int32_t new_val = 3000;

/**
 * @brief Returns the current value of the custom variable
 *
 * @return int always 0
 */
static int at_query_value()
{
    snprintf(g_at_query_buf, ATQUERY_SIZE, "Custom Value: %d", new_val);
    return 0;
}

/**
 * @brief Command to set the custom variable
 *
 * @param str the new value for the variable without the AT part
 * @return int 0 if the command was succesfull, 5 if the parameter was wrong
 */
static int at_exec_value(char *str)
{
    new_val = strtol(str, NULL, 0);
    MYLOG("APP", "Value number >>%ld<<", new_val);
    return 0;
}

/**
 * @brief Example how to show the last LoRa packet content
 *
 * @return int always 0
 */
static int at_query_packet()
{
    snprintf(g_at_query_buf, ATQUERY_SIZE, "Packet: %02X%02X%02X%02X",
             g_lpwan_data.data_flag1,
             g_lpwan_data.data_flag2,
             g_lpwan_data.batt_1,
             g_lpwan_data.batt_2);
    return 0;
}

/**
 * @brief List of all available commands with short help and pointer to functions
 *
 */
atcmd_t g_user_at_cmd_list_example[] = {
    /*|    CMD    |     AT+CMD?      |    AT+CMD=?    |  AT+CMD=value |  AT+CMD  |  Permission  |*/
    // GNSS commands
    {"+SETVAL", "Get/Set custom variable", at_query_value, at_exec_value, NULL, "RW"},
    {"+LIST", "Show last packet content", at_query_packet, NULL, NULL, "R"},
};

atcmd_t *g_user_at_cmd_list = g_user_at_cmd_list_example;

/** Number of user defined AT commands */
uint8_t g_user_at_cmd_num = sizeof(g_user_at_cmd_list_example) / sizeof(atcmd_t);
These five examples explain the usage of the API. In all examples the API callbacks and the additional functions (sensor readings, IRQ handling, GNSS location service) are separated into their own sketches.
The WisBlock-API-V2 has been used as well in the following PlatformIO projects:
When used with the RAK4631, firmware update over BLE is already included in the library. Firmware updates for the
RAK4631 can be done by using the Nordic nRF Toolbox (available for Android and iOS) or with the WisBlock Toolbox (my
Android application).
For the update, copy the created update file (usually called firmware.zip) from the
.pio/build/{device} folder, copy it to you phone and use one of the applications to update the firmware.
If the firmware update via BLE fails, update the device to the latest bootloader for the RAK4631 with the version V0.4.3. You can find the latest bootloader in the WisBlock repo
The API provides some calls for management, to send LoRaWAN packet, to send BLE UART data and to trigger events.
void api_set_version(uint16_t sw_1 = 1, uint16_t sw_2 = 0, uint16_t sw_3 = 0);
This
function can be called to set the application version. The application version can be requested by AT commands.
The version number is build from three digits:sw_1 ==> major version increase
on API change / not backwards compatiblesw_2 ==> minor version increase on API
change / backward compatiblesw_3 ==> patch version increase on bugfix, no
affect on API
If api_set_version is not called, the application version defaults to
1.0.0.
void api_reset(void);
Performs a reset of the WisBlock Core module
void api_wake_loop(uint16_t reason);
This is used to wakeup the loop with an event.
The reason must be defined in app.h. After the loop woke
app, it will call the app_event_handler() with the value of
reason in g_task_event_type.
As an example, this can be used to wakeup the device from the interrupt of an accelerometer sensor. Here as an
example an extract from the accelerometer example code.
In accelerometer.ino the event is defined. The first define is to set the signal, the
second is to clear the event after it was handled.
/** Define additional events */
#define ACC_TRIGGER 0b1000000000000000
#define N_ACC_TRIGGER 0b0111111111111111
Then in lis3dh_acc.ino in the interrupt callback function
void acc_int_handler(void) the loop is woke up with the signal
ACC_TRIGGER
void acc_int_handler(void)
{
    // Wake up the task to handle it
    api_wake_loop(ACC_TRIGGER);
}
And finally in accelerometer.ino the event is handled in
app_event_handler()
    // ACC triggered event
    if ((g_task_event_type & ACC_TRIGGER) == ACC_TRIGGER)
    {
        g_task_event_type &= N_ACC_TRIGGER;
        MYLOG("APP", "ACC IRQ wakeup");
        // Reset ACC IRQ register
        get_acc_int();

        // Set Status flag, it will trigger sending a packet
        g_task_event_type = STATUS;
    }
void api_log_settings(void);
This function can be called to list the complete
settings of the WisBlock device over USB. The output looks like:
Device status:
   RAK11310
   Auto join enabled
   Mode LPWAN
   Network joined
   Send Frequency 120
LPWAN status:
   Dev EUI AC1F09FFFE0142C8
   App EUI 70B3D57ED00201E1
   App Key 2B84E0B09B68E5CB42176FE753DCEE79
   Dev Addr 26021FB4
   NWS Key 323D155A000DF335307A16DA0C9DF53F
   Apps Key 3F6A66459D5EDCA63CBC4619CD61A11E
   OTAA enabled
   ADR disabled
   Public Network
   Dutycycle disabled
   Join trials 30
   TX Power 0
   DR 3
   Class 0
   Subband 1
   Fport 2
   Unconfirmed Message
   Region AS923-3
LoRa P2P status:
   P2P frequency 916000000
   P2P TX Power 22
   P2P BW 125
   P2P SF 7
   P2P CR 1
   P2P Preamble length 8
   P2P Symbol Timeout 0
void api_timer_stop(void)
Stops the timer that wakes up the MCU frequently.
void api_timer_restart(uint32_t new_time)
Restarts the timer with a new value. The
value is in milliseconds
void api_read_credentials(void);void api_set_credentials(void);
If LoRa P2P settings need to be hardcoded (e.g. the frequency, bandwidth, ...) this can be done in
setup_app().
First the saved settings must be read from flash with api_read_credentials();, then
settings can be changed. After changing the settings must be saved with
api_set_credentials().
As the WisBlock API checks if any changes need to be saved, the changed values will be only saved on the first boot
after flashing the application.
Example:
// Read credentials from Flash
api_read_credentials();

// Make changes to the credentials
g_lorawan_settings.p2p_frequency = 916000000;            // Use 916 MHz to send and receive
g_lorawan_settings.p2p_bandwidth = 0;                    // Bandwidth 125 kHz
g_lorawan_settings.p2p_sf = 7;                            // Spreading Factor 7
g_lorawan_settings.p2p_cr = 1;                            // Coding Rate 4/5
g_lorawan_settings.p2p_preamble_len = 8;                // Preample Length 8
g_lorawan_settings.p2p_tx_power = 22;                    // TX power 22 dBi

// Save hard coded LoRaWAN settings
api_set_credentials();
REMARK 1
Hard coded settings must be set in
void setup_app(void)!
REMARK 2
Keep in mind that parameters that are changed from with this method can be
changed over AT command or BLE BUT WILL BE RESET AFTER A REBOOT!
api_ble_printf() can be used to send data over the BLE UART.
print, println and printf
is supported.
REMARK
This command is not available on the RAK11310!
By default the BLE advertising is only active for 30 seconds after power-up/reset to lower the power consumption. By
calling void restart_advertising(uint16_t timeout); the advertising can be restarted
for timeout seconds.
REMARK
This command is not available on the RAK11310!
lmh_error_status send_lora_packet(uint8_t *data, uint8_t size, uint8_t fport = 0); is
used to send a data packet to the LoRaWAN server. *data is a pointer to the buffer
containing the data, size is the size of the packet. If the fport is 0, the
fPortdefined in the g_lorawan_settings structure is used.
bool send_p2p_packet(uint8_t *data, uint8_t size); is used to send a data packet Over
LORa P2P. *data is a pointer to the buffer containing the data,
size is the size of the packet.
After the TX cycle (including RX1 and RX2 windows) are finished, the result is hold in the global flag
g_rx_fin_result, the event LORA_TX_FIN is triggered and
the lora_data_handler() callback is called. In this callback the result can be checked
and if necessary measures can be taken.
CayenneLPP is a format designed by myDevices to integrate LoRaWan nodes into
their IoT Platform.
The CayenneLPP library extends the available data types with
several IPSO data types not included in the original work by Johan Stokking or most of the forks and side
works by other people, these additional data types are not supported by myDevices Cayenne.
The WisBlock API uses
a few more data types that extends both the original and ElectronicCats data types to better support the wide range
of the WisBlock Sensor Modules.
To use the extended data types WisBlock API already includes the required header file.
To be able to use the Cayenne LPP functions, an instance of the class is required.
/** LoRaWAN packet */
WisCayenne g_solution_data(255);
Before adding data, the packet buffer needs to be reset
// Reset the packet
g_solution_data.reset();
The CayenneLPP library has API calls for the different data types supported. See CayenneLPP API for details. In addition to these API calls WisBlock API adds 5 more calls to them. These API calls are for different GNSS formats and for the VOC sensor data:
uint8_t addGNSS_4(uint8_t channel, int32_t latitude, int32_t longitude, int32_t altitude);
uint8_t addGNSS_6(uint8_t channel, int32_t latitude, int32_t longitude, int32_t altitude);
uint8_t addGNSS_H(int32_t latitude, int32_t longitude, int16_t altitude, int16_t accuracy, int16_t battery);
uint8_t addGNSS_T(int32_t latitude, int32_t longitude, int16_t altitude, float accuracy, int8_t sats);
uint8_t addVoc_index(uint8_t channel, uint32_t voc_index);
1) Standard Cayenne LPP location format
/**
 * @brief Add GNSS data in Cayenne LPP standard format
 *
 * @param channel LPP channel
 * @param latitude Latitude as read from the GNSS receiver
 * @param longitude Longitude as read from the GNSS receiver
 * @param altitude Altitude as read from the GNSS receiver
 * @return uint8_t bytes added to the data packet
 */
uint8_t WisCayenne::addGNSS_4(uint8_t channel, int32_t latitude, int32_t longitude, int32_t altitude)
2) Extended precision location format
/**
 * @brief Add GNSS data in custom Cayenne LPP format
 *        Requires changed decoder in LNS and visualization
 *        Does not work with Cayenne LPP MyDevices
 *
 * @param channel LPP channel
 * @param latitude Latitude as read from the GNSS receiver
 * @param longitude Longitude as read from the GNSS receiver
 * @param altitude Altitude as read from the GNSS receiver
 * @return uint8_t bytes added to the data packet
 */
uint8_t WisCayenne::addGNSS_6(uint8_t channel, int32_t latitude, int32_t longitude, int32_t altitude)
3) Helium Mapper data format. This is not a CayenneLPP format. The API is just used to make it easier to create a data packet that makes it easier to generate a packet that is compatible with the Helium Mapper integration.
/**
 * @brief Add GNSS data in Helium Mapper format
 *
 * @param channel LPP channel
 * @param latitude Latitude as read from the GNSS receiver
 * @param longitude Longitude as read from the GNSS receiver
 * @param altitude Altitude as read from the GNSS receiver
 * @param accuracy Accuracy of reading from the GNSS receiver
 * @param battery Device battery voltage in V
 * @return uint8_t bytes added to the data packet
 */
uint8_t WisCayenne::addGNSS_H(int32_t latitude, int32_t longitude, int16_t altitude, int16_t accuracy, int16_t battery)
4) disk91 LoRaWAN field tester data format. This is as well not a CayenneLPP format. The API is just used to make it easier to create a data packet that makes it easier to generate a packet that is compatible with the Low Cost LoRaWan Field Tester.
/**
 * @brief Add GNSS data in Field Tester format
 *
 * @param latitude Latitude as read from the GNSS receiver
 * @param longitude Longitude as read from the GNSS receiver
 * @param altitude Altitude as read from the GNSS receiver
 * @param accuracy Accuracy of reading from the GNSS receiver
 * @param sats Number of satellites of reading from the GNSS receiver
 * @return uint8_t bytes added to the data packet
 */
uint8_t WisCayenne::addGNSS_T(int32_t latitude, int32_t longitude, int16_t altitude, float accuracy, int8_t sats)
5) VOC sensor data requires a digital format with 16 bits length that is not supported by CayenneLPP originally.
/**
 * @brief Add the VOC index
 *
 * @param channel VOC channel
 * @param voc_index VOC index
 * @return uint8_t bytes added to the data packet
 */
uint8_t WisCayenne::addVoc_index(uint8_t channel, uint32_t voc_index)
The CayenneLPP data packets are always in the format
<Channel #><Channel ID><data bytes>.
To make it easier in data encoders used in
LoRaWAN servers and integration data collected by WisBlock sensors have always the same channel number (if these API
is used). Here is the list of currently assigned channel numbers, channel ID's and which modules are using the
combination.
| Data | Channel # | Channel ID | Length | Comment | Required Module | Decoded Field Name |
| Battery value | 1 | 116 | 2 bytes | 0.01 V Unsigned MSB | RAK4631 | voltage_1 |
| Humidity | 2 | 104 | 1 byte | in %RH | RAK1901 | humidity_2 |
| Temperature | 3 | 103 | 2 bytes | in ° C | RAK1901 | temperature_3 |
| Barometric Pressure | 4 | 115 | 2 bytes | in hPa (mBar) | RAK1902 | barometer_4 |
| Illuminance | 5 | 101 | 2 bytes | 1 lux unsigned | RAK1903 | illuminance_5 |
| Humidity 2 | 6 | 104 | 1 byte | in %RH | RAK1906 | humidity_6 |
| Temperature 2 | 7 | 103 | 2 bytes | in ° C | RAK1906 | temperature_7 |
| Barometric Pressure 2 | 8 | 115 | 2 bytes | in hPa (mBar) | RAK1906 | barometer_8 |
| Gas Resistance 2 | 9 | 2 | 2 bytes | 0.01 signed (kOhm) | RAK1906 | analog_9 |
| GNSS stand. resolution | 10 | 136 | 9 bytes | 3 byte lon/lat 0.0001 °, 3 bytes alt 0.01 meter | RAK1910, RAK12500 | gps_10 |
| GNSS enhanced resolution | 10 | 137 | 11 bytes | 4 byte lon/lat 0.000001 °, 3 bytes alt 0.01 meter | RAK1910, RAK12500 | gps_10 |
| Soil Temperature | 11 | 103 | 2 bytes | in ° C | RAK12023/RAK12035 | temperature_11 |
| Soil Humidity | 12 | 104 | 1 byte | in %RH | RAK12023/RAK12035 | humidity_12 |
| Soil Humidity Raw | 13 | 2 | 2 bytes | 0.01 signed | RAK12023/RAK12035 | analog_in_13 |
| Soil Data Valid | 14 | 102 | 1 byte | bool | RAK12023/RAK12035 | presence_14 |
| Illuminance 2 | 15 | 101 | 2 bytes | 1 lux unsigned | RAK12010 | illuminance_15 |
| VOC | 16 | 138 | 2 bytes | VOC index | RAK12047 | voc_16 |
| MQ2 Gas | 17 | 2 | 2 bytes | 0.01 signed | RAK12004 | analog_in_17 |
| MQ2 Gas Percentage | 18 | 120 | 1 byte | 1-100% unsigned | RAK12004 | percentage_18 |
| MG812 Gas | 19 | 2 | 2 bytes | 0.01 signed | RAK12008 | analog_in_19 |
| MG812 Gas Percentage | 20 | 120 | 1 byte | 1-100% unsigned | RAK12008 | percentage_20 |
| MQ3 Alcohol Gas | 21 | 2 | 2 bytes | 0.01 signed | RAK12009 | analog_in_21 |
| MQ3 Alcohol Gas Perc. | 22 | 120 | 1 byte | 1-100% unsigned | RAK12009 | percentage_22 |
| ToF distance | 23 | 2 | 2 bytes | 0.01 signed | RAK12014 | analog_in_23 |
| ToF Data Valid | 24 | 102 | 1 byte | bool | RAK12014 | presence_24 |
| Gyro triggered | 25 | 134 | 6 bytes | 2 bytes per axis, 0.01 °/s | RAK12025 | gyrometer_25 |
| Gesture detected | 26 | 0 | 1 byte | 1 byte with id of gesture | RAK14008 | digital_in_26 |
| LTR390 UVI value | 27 | 2 | 2 bytes | 0.01 signed | RAK12019 | analog_in_27 |
| LTR390 UVS value | 28 | 101 | 2 bytes | 1 lux unsigned | RAK12019 | illuminance_28 |
| INA219 Current | 29 | 2 | 2 bytes | 0.01 signed | RAK16000 | analog_29 |
| INA219 Voltage | 30 | 2 | 2 bytes | 0.01 signed | RAK16000 | analog_30 |
| INA219 Power | 31 | 2 | 2 bytes | 0.01 signed | RAK16000 | analog_31 |
| Touchpad left | 32 | 102 | 1 byte | bool | RAK14002 | presence_32 |
| Touchpad middle | 33 | 102 | 1 byte | bool | RAK14002 | presence_33 |
| Touchpad right | 34 | 102 | 1 byte | bool | RAK14002 | presence_34 |
| SCD30 CO2 concentration | 35 | 125 | 2 bytes | 1 ppm unsigned | RAK12037 | concentration_35 |
| SCD30 temperature | 36 | 103 | 2 bytes | in ° C | RAK12037 | temperature_36 |
| SCD30 humidity | 37 | 104 | 1 byte | in %RH | RAK12037 | humidity_37 |
| MLX90632 sensor temp | 38 | 103 | 2 bytes | in ° C | RAK12003 | temperature_38 |
| MLX90632 object temp | 39 | 103 | 2 bytes | in ° C | RAK12003 | temperature_39 |
| PM 1.0 value | 40 | 103 | 2 bytes | in ug/m3 | RAK12003 | voc_40 |
| PM 2.5 value | 41 | 103 | 2 bytes | in ug/m3 | RAK12003 | voc_41 |
| PM 10 value | 42 | 103 | 2 bytes | in ug/m3 | RAK12003 | voc_42 |
| Earthquake event | 43 | 102 | 1 byte | bool | RAK12027 | presence_43 |
| Earthquake SI value | 44 | 2 | 2 bytes | analog 10 * m/s | RAK12027 | analog_44 |
| Earthquake PGA value | 45 | 2 | 2 bytes | analog 10 * m/s2 | RAK12027 | analog_45 |
| Earthquake SHUTOFF alert | 46 | 102 | 1 byte | bool | RAK12027 | presence_46 |
| LPP_CHANNEL_EQ_COLLAPSE | 47 | 102 | 1 byte | bool | RAK12027 | presence_47 |
| Switch Status | 48 | 102 | 1 byte | bool | RAK13011 | presence_48 |
Channel ID's in cursive are extended format and not supported by standard Cayenne LPP data decoders.
An full and updated list of used data formats can be found in our RAKwireless_Standardized_Payload
.
The RAKwireless_Standardized_Payload repo includes as well a matching decoder.
The code used here is the api-test.ino example.
These are the required includes and definitions for the user application and the API interface
In this example we
hard-coded the LoRaWAN credentials. It is strongly recommended TO NOT DO THAT to avoid duplicated
node credentials
Alternative options to setup credentials are
#include <Arduino.h>
/** Add you required includes after Arduino.h */
#include <Wire.h>

// Debug output set to 0 to disable app debug output
#ifndef MY_DEBUG
#define MY_DEBUG 1
#endif

#ifdef NRF52_SERIES
#if MY_DEBUG > 0
#define MYLOG(tag, ...)                     \
    do                                      \
    {                                       \
        if (tag)                            \
            PRINTF("[%s] ", tag);           \
        PRINTF(__VA_ARGS__);                \
        PRINTF("\n");                       \
        if (g_ble_uart_is_connected)        \
        {                                   \
            g_ble_uart.printf(__VA_ARGS__); \
            g_ble_uart.printf("\n");        \
        }                                   \
    } while (0)
#else
#define MYLOG(...)
#endif
#endif
#ifdef ARDUINO_ARCH_RP2040
#if MY_DEBUG > 0
#define MYLOG(tag, ...)                  \
    do                                   \
    {                                    \
        if (tag)                         \
            Serial.printf("[%s] ", tag); \
        Serial.printf(__VA_ARGS__);      \
        Serial.printf("\n");             \
    } while (0)
#else
#define MYLOG(...)
#endif
#endif

/** Include the WisBlock-API-V2 */
#include <WisBlock-API-V2.h> // Click to install library: http://librarymanager/All#WisBlock-API-V2

/** Define the version of your SW */
#define SW_VERSION_1 1 // major version increase on API change / not backwards compatible
#define SW_VERSION_2 0 // minor version increase on API change / backward compatible
#define SW_VERSION_3 0 // patch version increase on bugfix, no affect on API

/**
   Optional hard-coded LoRaWAN credentials for OTAA and ABP.
   It is strongly recommended to avoid duplicated node credentials
   Options to setup credentials are
   - over USB with AT commands
   - over BLE with My nRF52 Toolbox
*/
uint8_t node_device_eui[8] = {0x00, 0x0D, 0x75, 0xE6, 0x56, 0x4D, 0xC1, 0xF3};
uint8_t node_app_eui[8] = {0x70, 0xB3, 0xD5, 0x7E, 0xD0, 0x02, 0x01, 0xE1};
uint8_t node_app_key[16] = {0x2B, 0x84, 0xE0, 0xB0, 0x9B, 0x68, 0xE5, 0xCB, 0x42, 0x17, 0x6F, 0xE7, 0x53, 0xDC, 0xEE, 0x79};
uint8_t node_nws_key[16] = {0x32, 0x3D, 0x15, 0x5A, 0x00, 0x0D, 0xF3, 0x35, 0x30, 0x7A, 0x16, 0xDA, 0x0C, 0x9D, 0xF5, 0x3F};
uint8_t node_apps_key[16] = {0x3F, 0x6A, 0x66, 0x45, 0x9D, 0x5E, 0xDC, 0xA6, 0x3C, 0xBC, 0x46, 0x19, 0xCD, 0x61, 0xA1, 0x1E};
Forward declarations of some functions (required when using PlatformIO)
/** Application function definitions */
void setup_app(void);
bool init_app(void);
void app_event_handler(void);
void ble_data_handler(void) __attribute__((weak));
void lora_data_handler(void);
Here the application name is set to RAK-TEST. The name will be extended with the nRF52 unique chip ID. This name is used in the BLE advertising.
/** Application stuff */

/** Set the device name, max length is 10 characters */
char g_ble_dev_name[10] = "RAK-TEST";
Some flags and signals required
/** Flag showing if TX cycle is ongoing */
bool lora_busy = false;

/** Send Fail counter **/
uint8_t send_fail = 0;
This function is called at the very beginning of the application start. In this function everything should be setup
that is required before Arduino setup() is executed. This could be for example the
LoRaWAN credentials.
In this example we hard-coded the LoRaWAN credentials. It is strongly recommended TO NOT DO THAT to
avoid duplicated node credentials
Alternative options to setup credentials are
g_enable_ble is set. If true, the BLE interface is initialized. If
false, the BLE interface is not activated, which can lower the power consumption.void setup_app(void)
{
Serial.begin(115200);
time_t serial_timeout = millis();
// On nRF52840 the USB serial is not available immediately
while (!Serial)
{
if ((millis() - serial_timeout) < 5000)
{
delay(100);
digitalWrite(LED_GREEN, !digitalRead(LED_GREEN));
}
else
{
break;
}
}
digitalWrite(LED_GREEN, LOW);
MYLOG("APP", "Setup WisBlock API Example");
#ifdef NRF52_SERIES
// Enable BLE
g_enable_ble = true;
#endif
// Set firmware version
api_set_version(SW_VERSION_1, SW_VERSION_2, SW_VERSION_3);
// Optional
// Setup LoRaWAN credentials hard coded
// It is strongly recommended to avoid duplicated node credentials
// Options to setup credentials are
// -over USB with AT commands
// -over BLE with My nRF52 Toolbox
// Read LoRaWAN settings from flash
api_read_credentials();
// Change LoRaWAN settings
g_lorawan_settings.auto_join = true; // Flag if node joins automatically after reboot
g_lorawan_settings.otaa_enabled = true; // Flag for OTAA or ABP
memcpy(g_lorawan_settings.node_device_eui, node_device_eui, 8); // OTAA Device EUI MSB
memcpy(g_lorawan_settings.node_app_eui, node_app_eui, 8); // OTAA Application EUI MSB
memcpy(g_lorawan_settings.node_app_key, node_app_key, 16); // OTAA Application Key MSB
memcpy(g_lorawan_settings.node_nws_key, node_nws_key, 16); // ABP Network Session Key MSB
memcpy(g_lorawan_settings.node_apps_key, node_apps_key, 16); // ABP Application Session key MSB
g_lorawan_settings.node_dev_addr = 0x26021FB4; // ABP Device Address MSB
g_lorawan_settings.send_repeat_time = 120000; // Send repeat time in milliseconds: 2 * 60 * 1000 => 2 minutes
g_lorawan_settings.adr_enabled = false; // Flag for ADR on or off
g_lorawan_settings.public_network = true; // Flag for public or private network
g_lorawan_settings.duty_cycle_enabled = false; // Flag to enable duty cycle (validity depends on Region)
g_lorawan_settings.join_trials = 5; // Number of join retries
g_lorawan_settings.tx_power = 0; // TX power 0 .. 15 (validity depends on Region)
g_lorawan_settings.data_rate = 3; // Data rate 0 .. 15 (validity depends on Region)
g_lorawan_settings.lora_class = 0; // LoRaWAN class 0: A, 2: C, 1: B is not supported
g_lorawan_settings.subband_channels = 1; // Subband channel selection 1 .. 9
g_lorawan_settings.app_port = 2; // Data port to send data
g_lorawan_settings.confirmed_msg_enabled = LMH_UNCONFIRMED_MSG; // Flag to enable confirmed messages
g_lorawan_settings.resetRequest = true; // Command from BLE to reset device
g_lorawan_settings.lora_region = LORAMAC_REGION_AS923_3; // LoRa region
// Save LoRaWAN settings
api_set_credentials();
This function is called after BLE and LoRa are already initialized. Ideally this is the place to initialize application specific stuff like sensors or actuators. In this example it is unused
/**
 * @brief Application specific initializations
 *
 * @return true Initialization success
 * @return false Initialization failure
 */
bool init_app(void)
{
    MYLOG("APP", "init_app");
    return true;
}
This callback is called on the STATUS event. The STATUS event is triggered
frequently, the time is set by send_repeat_time. It is triggered as well by user defined events. See
example RAK1904_example how user defined events are defined.
It is important that event flags are reset. As example the STATUS event is reset by this code
sequence:
if ((g_task_event_type & STATUS) == STATUS)
{
    g_task_event_type &= N_STATUS;
    ...
}
The STATUS event is used to send frequently uplink packets to the LoRaWAN server.
In this example
code we restart as well the BLE advertising for 15 seconds. Otherwise BLE adverstising is only active for 30 seconds
after power-up/reset.
void app_event_handler(void)
{
  // Timer triggered event
  if ((g_task_event_type & STATUS) == STATUS)
  {
    g_task_event_type &= N_STATUS;
    MYLOG("APP", "Timer wakeup");

#ifdef NRF52_SERIES
    // If BLE is enabled, restart Advertising
    if (g_enable_ble)
    {
      restart_advertising(15);
    }
#endif

    if (lora_busy)
    {
      MYLOG("APP", "LoRaWAN TX cycle not finished, skip this event");
    }
    else
    {

      // Dummy packet

      uint8_t dummy_packet[] = {0x10, 0x00, 0x00};

      lmh_error_status result = send_lora_packet(dummy_packet, 3);
      switch (result)
      {
        case LMH_SUCCESS:
          MYLOG("APP", "Packet enqueued");
          // Set a flag that TX cycle is running
          lora_busy = true;
          break;
        case LMH_BUSY:
          MYLOG("APP", "LoRa transceiver is busy");
          break;
        case LMH_ERROR:
          MYLOG("APP", "Packet error, too big to send with current DR");
          break;
      }
    }
  }
}
This callback is used to handle data received over the BLE UART. If you do not need BLE UART functionality, you can
remove this function completely.
In this example we forward the received BLE UART data to the AT command interpreter. This way, we can submit AT
commands either over the USB port or over the BLE UART port.
BLE communication is only supported on the RAK4631.
The RAK11310 does not have BLE.
#ifdef NRF52_SERIES
void ble_data_handler(void)
{
  if (g_enable_ble)
  {
    /**************************************************************/
    /**************************************************************/
    /// \todo BLE UART data arrived
    /// \todo or forward them to the AT command interpreter
    /// \todo parse them here
    /**************************************************************/
    /**************************************************************/
    if ((g_task_event_type & BLE_DATA) == BLE_DATA)
    {
      MYLOG("AT", "RECEIVED BLE");
      // BLE UART data arrived
      // in this example we forward it to the AT command interpreter
      g_task_event_type &= N_BLE_DATA;

      while (g_ble_uart.available() > 0)
      {
        at_serial_input(uint8_t(g_ble_uart.read()));
        delay(5);
      }
      at_serial_input(uint8_t('\n'));
    }
  }
}
#endif
This callback is called on three different events:
The event LORA_DATA is triggered if a downlink packet from the LoRaWAN server or a LoRa P2P packet has arrived. In this example we are not parsing the data, they are only printed out to the LOG and over BLE UART (if a device is connected)
The event LORA_TX_FIN is triggered after sending an uplink packet is finished, including the RX1 and
RX2 windows. If CONFIRMED packets are sent, the global flag
g_rx_fin_result contains the result of the confirmed transmission. If
g_rx_fin_result is true, the LoRaWAN server acknowledged the uplink packet by sending
an ACK. Otherwise the g_rx_fin_result is set to false,
indicating that the packet was not received by the LoRaWAN server (no gateway in range, packet got damaged on the
air. If UNCONFIRMED packets are sent or if LoRa P2P mode is used, the flag
g_rx_fin_result is always true.
The event LORA_JOIN_FIN is called after the Join request/Join accept/reject cycle is finished. The
global flag g_task_event_type contains the result of the Join request. If true, the
node has joined the network. If false the join didn't succeed. In this case the join cycle could be restarted or
the node could report an error.
void lora_data_handler(void)
{
  // LoRa data handling
  if ((g_task_event_type & LORA_DATA) == LORA_DATA)
  {
    /**************************************************************/
    /**************************************************************/
    /// \todo LoRa data arrived
    /// \todo parse them here
    /**************************************************************/
    /**************************************************************/
    g_task_event_type &= N_LORA_DATA;
    MYLOG("APP", "Received package over LoRa");
    char log_buff[g_rx_data_len * 3] = {0};
    uint8_t log_idx = 0;
    for (int idx = 0; idx < g_rx_data_len; idx++)
    {
      sprintf(&log_buff[log_idx], "%02X ", g_rx_lora_data[idx]);
      log_idx += 3;
    }
    lora_busy = false;
    MYLOG("APP", "%s", log_buff);
  }

  // LoRa TX finished handling
  if ((g_task_event_type & LORA_TX_FIN) == LORA_TX_FIN)
  {
    g_task_event_type &= N_LORA_TX_FIN;

    MYLOG("APP", "LPWAN TX cycle %s", g_rx_fin_result ? "finished ACK" : "failed NAK");

    if (!g_rx_fin_result)
    {
      // Increase fail send counter
      send_fail++;

      if (send_fail == 10)
      {
        // Too many failed sendings, reset node and try to rejoin
        delay(100);
        sd_nvic_SystemReset();
      }
    }

    // Clear the LoRa TX flag
    lora_busy = false;
  }

  // LoRa Join finished handling
  if ((g_task_event_type & LORA_JOIN_FIN) == LORA_JOIN_FIN)
  {
    g_task_event_type &= N_LORA_JOIN_FIN;
    if (g_join_result)
    {
      MYLOG("APP", "Successfully joined network");
    }
    else
    {
      MYLOG("APP", "Join network failed");
      /// \todo here join could be restarted.
      // lmh_join();
    }
  }
}
In Arduino it is not possible to define settings in the .ino file that can control behaviour of the the included
libraries. To change debug log and usage of the blue BLE LED you have to open the file WisBlock-API-V2.h in the libraries source folder.
To enable/disable the API debug (API_LOG()) open the file WisBlock-API-V2.h in the libraries source
folder.
Look for
#define API_DEBUG 1
in the file.
0 -> No debug output
1 -> API debug output
To enable/disable the application debug (MY_LOG()) You can find in the examples (either
in the .ino file or app.h)
#define MY_DEBUG 1
in the file.
0 -> No debug output
1 -> Application debug output
Look for
#define NO_BLE_LED 1
in the file WisBlock-API-V2
0 -> the blue LED will be used to indicate BLE status
1 -> the blue LED will not used
REMARK
RAK11310 has no BLE and the blue LED can be used for other purposes.
Debug output can be controlled by defines in the platformio.ini
API_DEBUG controls debug output of the WisBlock API
0 -> No debug outpuy
1 -> WisBlock API debug output
MY_DEBUG controls debug output of the application itself
0 -> No debug outpuy
1 -> Application debug output
NO_BLE_LED controls the usage of the blue BLE LED.
0 -> the blue LED will be used to indicate BLE status
1 -> the blue LED will not used
Example for no debug output and no blue LED
build_flags =
    -DAPI_DEBUG=0    ; 0 Disable WisBlock API debug output
    -DMY_DEBUG=0     ; 0 Disable application debug output
    -DNO_BLE_LED=1   ; 1 Disable blue LED as BLE notificator
Library published under MIT license
Credits:
AT Command functions: Taylor Lee (taylor.lee@rakwireless.com)